
Variable Impedance - What is it?
Humour me for a minute - I have an analogy that works here… Imagine a train crossing a bridge that is suspended high above ground between two mountain peaks.
The train is your source resistance - or in this case, the microphone. It can be low impedance (a light train) or high impedance (a heavy train).
The bridge is your load impedance - or in this case, the preamplifier. The bridge can be stiff or saggy (I know, I know!). The stiffer the bridge, the easier it is for the train (passengers = signal) to cross the mountainous gap! The heavier the train, the stronger the bridge should be…
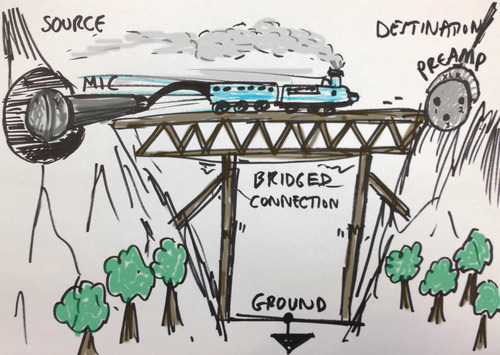
In a typical “bridging” audio connection - you have a low source impedance and approximately 5-10 times that impedance in the load (stiffer bridge), this way as much voltage signal as possible arrives at the destination. The goal is to keep the signal “above” ground.
Normally we assume 150 ohms for the microphone output impedance and 1500 ohms for the preamplifier input impedance (x10). However microphones vary their output (source) resistance with frequency as both resistive AND reactive (inductive/capacitive) components are at play when forming an “impedance”.
Impedances & Bridging Loads - How They Work
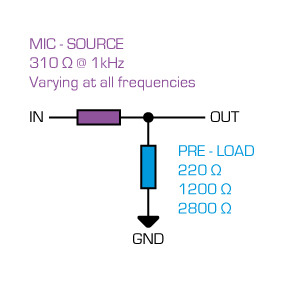
The connection between mic and preamplifier can be seen as a typical potential divider - let’s take a standard SM57 dynamic microphone as an example. It’s output impedance is stated as a nominal 310 ohms.
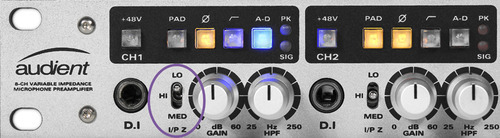
The ASP880 has three input impedance options:
- LO - 220 ohms (this is a saggy bridge)
- MED - 1200 ohms (this is a classic 1970’s style bridge)
- HI - 2800 ohms (this is a modern, strong and well braced bridge)
Imagine when the two devices are connected together - a 310 ohm source with a variable load from 220-2800 ohms:
The SM57 connects to the ASP880 preamplifier and we want to get as much tone and output voltage from the mic as possible - the preamplifier then adds 40-60dB of gain to this signal for recording.
For anyone not familiar with a potential divider - this simple circuit is the building block of all electronics and allows us to figure out “voltage transfer” between two points.
The simplest way to look at it is that the stiffer the load (R2), the more voltage from the source (R1) is carried to the output.
Vin = 1 volt, R1 = 310 ohms, R2 = 220, 1200 or 2800 ohms, Vout changes:
- R2 = 220 ohms, Vout = 0.41 volt
- R2 = 1200 ohms, Vout = 0.80 volt
- R2 = 2800 ohms, Vout = 0.90 volt
Of course, who cares about voltage when we’re sound engineers?!
To quote Ray Charles “How’s it sound baby?” - well, we’ll get there soon…
If we take into account that all dynamic microphones such as SM57/58, SM7, D12, MD421 or ribbon mics such as a Coles 4038 or Royer R121 have substantial varying output resistances with frequency - they use coils, transformers and/or large magnets to create inductive fields that convert acoustic movement into electrical voltage… what we get is a dynamically changing frequency response that can be heavily affected by the loading - or stiffness of the bridge!
The typical output impedance of an SM57 vs frequency looks approximately like this, it might remind you of a small loudspeaker:
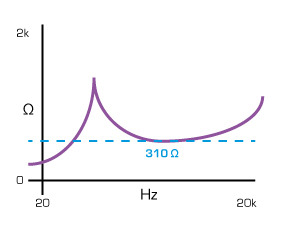
If we were to figure out a potential divider for every point on that purple curve, we could understand the signal transfer for each frequency from the mic to the preamplifier. What we actually end up with is not just a change in signal level BUT A CHANGE IN TONE!

What To Expect & Listen To
On top of level changes (which you should be aware of if you want to do a proper level matched A/B) we can experience the following changes in tone when varying the load that the microphone operates into:
- Speed of delivery - transient content
- Punch
- Detail - in particular the “room” pickup from the off-axis parts of the mic
- Frequency response & timbre
- Overall output level (-5dB for 220 ohms, -1dB for 1200 ohms, referenced to 0dB attenuation at 2800 ohms with a 150 ohm source)
I like to display these on something I call the TRIANGLE OF TONE. Essentially a system that allows you to mark up the audible changes to triangulate the appararent sonic footprint of a mic/pre combination.
Any of the descriptors can be as you desire - just make sure that opposites face each other on a line…
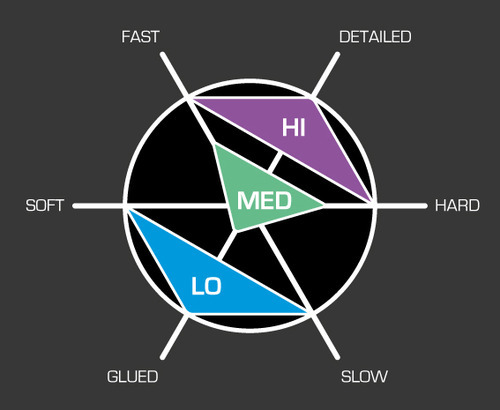
To describe how I hear it - the ASP880 when set to HI provides detail, punch and a fast presentation with lots of low end weight.
On MED the sound becomes a bit tighter and mid focused with a good balance of everything - a classic kind of presentation.
Set to LO, microphones tend to take on a different personality with a more glued transient to the main body of the sound, an overall slower presentation with some loss of space/detail - great for making a bad room sound a bit better!
Of course - each microphone reacts differently and it is definitely a case of FLIP THE SWITCH, LISTEN & DECIDE.
However - some things to bear in mind:
- Moving coil and ribbon mics display the greatest tonal change
- Transformer output capacitor microphones can also provide tonal variation with variable impedance
- Solid-state output (50 ohm typical) capacitor microphones are such a well designed, light and nimble train that they are often immune to loading effects and will display a much more subtle change, if at all
- Contrary to popular belief, many ribbon microphones provide more generous low frequency performance (with less ringing) and greater sonic delivery when operated into higher impedances, so be sure to try the 3600 ohm HI setting!